
Making Inkscape Do Nice Things
The more I am using software for the KDE system, the more I like it. I mean that literally: very powerful applications that can do pretty much everything you would need from them, but they are inscrutable and unless you spend a ton of time with them, you won’t get much benefit at all.
KDE is not alone there. I guess the single most needlessly inscrutable application ever written by mankind is Blender, a monstrosity from a user interface perspective that looks like it is a sysadmin tool written for glitz effects and pretty pics. The novice that handles Blender (= me) is utterly lost at first and it’s quite impossible to tell what to do and how.
There are tons of open source applications that behave the same way. A real shame, since many of them would be wonderful if there just had been a little more care to detail and usability. But having dealt with software developers for decades, I know that it’s usually a stern fiat that makes us do what’s right for users, not our own inclination.
[Note: quick recipe is at the bottom.]
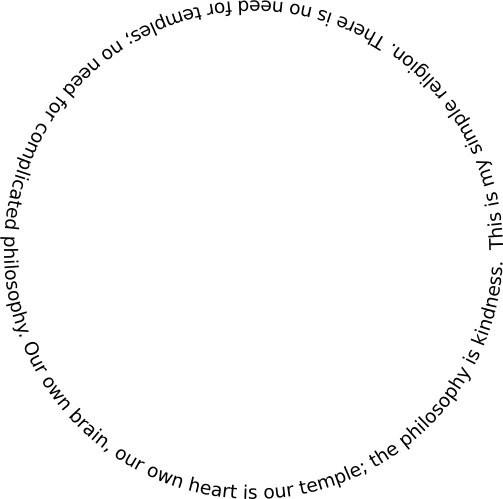
What I wanted to do is very simple: I wanted a text that rotates in a circle. It was supposed to fill the entire circumference and be read from the outside in, that is the base line of the font was farther from the center than the top. In short, it was supposed to look like this:
(The quote is from the Dalai Lama, in case you hadn’t guessed.)
Now, to do this in most vector graphics programs is a real pain, because they usually want to put the text with the baseline inside. I am not sure why that is, probably stems from the good old days of technical drafting, but it wasn’t suitable for my purposes.
I decided things should be possible, so I set out to do them. Inkscape seemed a decent enough solution, so I started it.
On the left is a toolbar with text and shapes. Creating the required text was not difficult, and thanks to the Unicode support built into KDE, I didn’t have to worry about the fact it was Greek. I just copied and pasted it into my text box, and everything was fine.
Next was the creation of the circle. I click on the circle tool and drag a rectangle, and to my utter surprise I get a pie shape with a slice missing. That’s decidedly not what I wanted or expected, and I guess that’s the first hint of something being entirely missed on the UI gene front.
After a very long while and many, many tries, I found out there was this minuscule button on top that allowed you to make the circle whole. Of course, said functionality was not available from the context menu or the object properties menu. Just goes to show that when you are using an application, you need to constantly look everywhere for some change in the controls. Yes, that was sarcasm.
So, now I have a circle and a text. I look at the Text menu and there is a helpful item: Put on Path. Sounds like the thing I want, no?
I click, nothing happens. After a while, primed by the circle debacle, I look at the status bar where it tells me I have to select a text and a path. I decide to do just that, and nothing happens. Turns out in Inkscape, you have to select the objects first, and then you select the action. Call it a Polish Notation Vector Graphics Application.
I get the opposite of what I want. The text is around the circle, but the wrong way, upside down. What next?
I decide to google away my problem and look for people that tried the same or similar. A helpful link from a lass revealed that life can be so much easier if you use paths instead of objects, so I convert my circle to a path and give the “Generate from Path” option a try, just as she recommends.
Why not continue with Text on Path? Because my helpfull savior had said she had never gotten it to work, so I just decided that since I hadn’t, either, I might just follow her lead and declare myself a follower.
So I take my text, convert it to a path, take my circle, convert that one to a path, and then use “Effects” -> “Generate from Path” -> “Pattern along Path”. It works!!! Unfortunately only long enough for Inkscape to freeze up my computer, for which it is banished to nice hell.When it starts, it’s automatically reniced!
I start Inkscape again, and try the same thing I did before. Create the circle, create the text, and then fit them around each other. This time I get this:

Of course, that’s not what I wanted. I don’t even really know what that is, looks like a Lissajous figure. Takes me a while to discern the text at the far center of the loopy craziness. What’s going on?
Well, remember the Polish Notation thing? It hit me badly this time: when deciding which items of the selection to use to wrap around the others, Inkscape takes whatever is on top (as in the vector graphic top, of foreground object) and makes that the thing that wraps around. Since I created the objects in reverse order, instead of wrapping the text around the circle, it wrapped the circle around the text. Duh!
Ok, I think it’s not just me that got frustrated with Inkscape’s object selection. The problem is that the developers sought out a way to make functionality happen without having to ask the user a thing. You first do whatever Inkscape wants, then you tell it to perform a transformation, then you get your end result.
Only problem: Inkscape doesn’t explain what it’s doing, and the whole Polish Notation thing barely works for most people in a context of calculators, imagine with vector graphics. I mean, if it’s too difficult to understand when you are dealing with simple plain numbers, how are you going to deal with paths,vector fields, and font selection?
I finally found my path, so to speak, and it was extremely simple in the end. Here a quick recipe for everybody that is trying to do the same:
Quick Recipe: Text Around Circle
-
Start Inkscape (hello?)
-
Select the ellipse/arc selection tool on the left or press F5
-
Drag a rectangle on the screen of approximately the size and shape you want
-
Click on the “make this a full ellipse” button on top
-
Type appropriate height and width in the (almost invisible) height and width inputs on top
-
Select the text creation tool
-
Click anywhere on the screen, well outside your circle
-
Enter or paste the text you want
-
Select the font and a size that will approximately fit around the circle using the font selector button on top
-
Select the circle
-
Select the fill/stroke button on top
-
Make both fill and stroke transparent – your circle will disappear
-
Convert circle to path using the conversion in the path menu
-
Reverse the path – the circle should still be selected
-
Add the text to your selection by clicking on the Shift key while you select
-
In the Text menu, select Text on Path
-
Change the font size or the circle size until the text fits snugly. Hitting Control while you resize the circle keeps it square